图片在Android系统中随处可见。例如,列表图标、快捷方式图标、图片按钮等。在Android中我们通过使用Drawable类来完成对图片的操作。Drawable类有很多个子类,如用来操作位图的BitmapDrawable类、用来操作颜色的ColorDrawable类,以及用来操作各种形状的ShapeDrawable类。
可以通过以下3种方法来实例化Drawable对象:一是使用保存在工程中的一个图片文件;二是使用XML文件定义Drawable属性;三是构造方法实例化,这种方法在实际开发中一般用不到。
1 使用图片文件创建Drawable对象
简单的一种方式是在工程的资源文件下面保存图片,该图片会被Eclipse自动在R类中创建引用,然后可以通过R.drawable.my_image使用该图片对象。下面看一个实例,实例步骤说明如下。
□ 将一个test.jpg图片文件放置在工程的资源文件夹下。
□ 创建布局文件main.xml并在其中添加一个ImageView组件。
□ 创建Activity,并实例化ImageView组件对象。
□ 调用ImageView的setImageResource()方法,引用资源id。
Activity代码如代码清单1所示。
代码清单1 MainActivity.java
package cn.com.farsight.drawable;
import android.app.Activity;
import android.os.Bundle;
import android.widget.ImageView;
public class MainActivity extends Activity {
//声明图片视图ImageView
private ImageView myImageView;
/** Called when the activity is first created. */
@Override
public void onCreate(Bundle savedInstanceState) {
super.onCreate(savedInstanceState);
setContentView(R.layout.main);
//通过findViewById方法获得ImageView
myImageView = (ImageView) findViewById(R.id.ImageView01);
//为ImageView设置图片资源
myImageView.setImageResource(R.drawable.test);
}
}
布局文件main.xml代码如代码清单2所示。
代码清单2 main.xml
<?xml version="1.0" encoding="utf-8"?>
<LinearLayout xmlns:android="//schemas.android.com/apk/res/android"
android:orientation="vertical"
android:layout_width="fill_parent"
android:layout_height="fill_parent"
>
<TextView
android:layout_width="fill_parent"
android:layout_height="wrap_content"
android:text="Drawable Test"/>
<ImageView
android:id="@+id/ImageView01"
android:layout_width="wrap_content"
android:layout_height="wrap_content"
></ImageView>
</LinearLayout>
程序运行结果如图1所示。
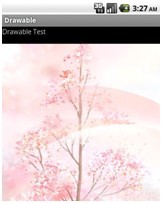
图1 从资源文件加载图片
2 使用XML文件定义Drawable属性
在布局文件中定义Drawable属性。例如,可以在布局文件中定义图片按钮的图片及应用程序的图标等。
代码清单3所示的代码演示了如何在AndroidManifest.xml配置文件中引用资源图标。
代码清单3 AndroidManifest.xml
<?xml version="1.0" encoding="utf-8"?>
<manifest xmlns:android="//schemas.android.com/apk/res/android"
package="cn.com.farsight.drawable"
android:versionCode="1"
android:versionName="1.0">
<application android:icon="@drawable/icon"
android:label="@string/app_name">
<activity android:name=".MainActivity"
android:label="@string/app_name">
<intent-filter>
<action android:name="android.intent.action.MAIN" />
<category android:name="android.intent.category.LAUNCHER" />
</intent-filter>
</activity>
</application>
<uses-sdk android:minSdkVersion="3"/>
</manifest>
在上一个例子中也可以通过这种方式来配置ImageView的图片资源。代码如代码清单4所示。
代码清单4 main.xml
<?xml version="1.0" encoding="utf-8"?>
<LinearLayout xmlns:android="//schemas.android.com/apk/res/android"
android:orientation="vertical"
android:layout_width="fill_parent"
android:layout_height="fill_parent"
>
<TextView
android:layout_width="fill_parent"
android:layout_height="wrap_content"
android:text="Drawable Test"/>
<ImageView
android:id="@+id/ImageView01"
android:layout_width="wrap_content"
android:layout_height="wrap_content"
android:src="@drawable/test"
></ImageView>
</LinearLayout>
3 Bitmap和BitmapFactory
除了以上提到的两种图片保存以外,还可以将图片文件保存在SDCard中,那么此时如何访问保存在SDCard中图片文件呢?在这种情况下,可以通过Bitmap和BitmapFactory两个类来读取文件。下面的代码演示了如何从SDCard中读取图片文件并将其设置为壁纸。
程序步骤说明如下:
□ 在SDCard中添加一个名称为wallpaper.jgp的图片文件。
□ 在创建Activity。
□ 在在Activity的onCreate()方法中通过BitmapFactory的decodeFile()方法传递文件路径,获取Bitmap对象。
□ 在调用setWallpaper()方法设置桌面。
程序代码如代码清单5所示。
代码清单5 MainActivity.java
package cn.com.farsight.drawable;
import java.io.IOException;
import android.app.Activity;
import android.graphics.Bitmap;
import android.graphics.BitmapFactory;
import android.os.Bundle;
public class MainActivity extends Activity {
@Override
public void onCreate(Bundle savedInstanceState) {
super.onCreate(savedInstanceState);
setContentView(R.layout.main);
//图片路径
String path="/sdcard/wallpaper.jpg";
//通过BitmapFactory获取Bitmap实例
Bitmap bm = BitmapFactory.decodeFile(path);
try{
//设置桌面
setWallpaper(bm);
}catch(IOException e){
e.printStackTrace();
}
}
}
程序运行后桌面被改变,如图2所示。
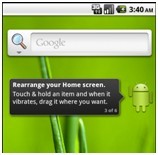
图2 Bitmap和BitmapFactory的使用