在Android中,对图像处理提供了很强的支持能力,缩放图像是图像处理中的一个常见功能,图像旋转也是如此,在Android中,专门实现了一个Matrix类来配合Bitmap类一起实现这类的特效,下面是Android中的一个实现:
代码:伸缩图像
public static Bitmap createScaledBitmap(Bitmap src, int dstWidth,int
dstHeight, boolean filter)
{
Matrix m;
synchronized (Bitmap.class)
{
m=sScaleMatr
ix;
sScaleMatrix
=null;
}
if (m==null)
{
m=new
Matrix();
}
final int width=src.getWidth
(); //获取图像宽
final int height=src.getHeight
(); //获取图像高
final float sx=dstWidth/(float)
width; //计算X轴伸缩因子
final float sy=dstHeight/(float)
height; //计算Y轴伸缩因子
m.setScale(sx, sy); //设置
伸缩因子
Bitmap b=Bitmap.createBitmap(src, 0, 0, width, height, m,
filter); //返回目的图像
synchronized (Bitmap.class)
{
if (sScaleMatrix==null)
{
sScaleMatrix=m;
}
}
return b;
}
在上面的例子中,会创建一个在X\Y轴上伸缩因子为sx、sy的图像。具体的图像创建是由createBitmap()方法来
完成的。
在Android中,目前支持多种伸缩类型:"matrix"、"fitStart"、"fitXY"、"fitCenter"、
"fitEnd"、"center"、"centerCrop"、"centerInside",如果希望在布局文件中将ImageView加载的图片能显示在固定的宽高内,方法如下:
< ImageView
android:layout_width="match_parent"
android:layout_height="1dip"
android:scaleType="fitXY"
android:gravity="fill_horizontal"
android:src="@drawable/dialog_divider_horizontal_light"
android:layout_marginLeft="10dip"
android:layout_marginRight="10dip"/>
下面是一个图像缩放的具体例子。
代码:图像缩放
package com.miaozl.test;
import android.app.Activity;
import android.graphics.Bitmap;
import android.graphics.BitmapFactory;
import android.graphics.Matrix;
import android.os.Bundle;
import android.widget.ImageView;
public class TestActivity extends Activity {
/** Called when the activity is first created. */
@Override
public void onCreate(Bundle savedInstanceState) {
super.onCreate(savedInstanceState);
setContentView(R.layout.main);
Matrix m = new Matrix();
Bitmap bitmap = BitmapFactory.decodeResource
(getResources(), R.drawable.rabbit);
ImageView src=(ImageView)findViewById(R.id.src);
src.setImageBitmap(bitmap);
int width = bitmap.getWidth();
int height = bitmap.getHeight();
int newWidth = 160;
int newHeight = 120;
float scaleWidth = ((float) newWidth)/width;
float scaleHeight = ((float) newHeight)/height;
m.setScale(scaleWidth, scaleHeight);
ImageView dest=(ImageView)findViewById
(R.id.dest);
Bitmap resizedBitmap = Bitmap.createBitmap(bitmap,
0, 0, width,height, m, true);
dest.setImageBitmap(resizedBitmap);
}
}
下面是工程的布局文件main.xml的具体实现:
< ?xml version="1.0" encoding="utf-8"?>
< LinearLayout
xmlns:android="//schemas.android.com/apk/res/android"
android:orientation="vertical"
android:layout_width="fill_parent"
android:layout_height="fill_parent">
< ImageView
android:layout_width="wrap_content"<
br />
android:layout_height="wrap_content"
android:layout_gravity="center_horiz
ontal"
android:id="@+id/src"/>
< ImageView
android:layout_width="wrap_content"<
br />
android:layout_height="wrap_content"
android:layout_gravity="center_horiz
ontal"
android:scaleType="center"
android:id="@+id/dest"/>
< /LinearLayout>
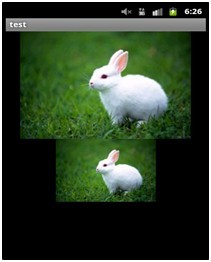
下图是对410×308的原始rabbit.jpg和缩放后的处理效果对比。