相对布局(RelativeLayout)是一种非常灵活的Android界面布局方式,能够通过指定界面元素与其他元素的相对位置关系,确定界面中所有元素的布局位置,能够大限度保证在各种屏幕类型的手机上正确显示界面布局。
在相对布局中,子控件的位置是相对兄弟控件或父容器而决定的。出于性能考虑,在设计相对布局时要按照控件之间的依赖关系排列,如View A 的位置相对于View B 来决定,则需要保证在布局文件中View B 在View A 的前面。
在进行相对布局时用到的属性很多,首先来看属性值只为true 或false 的属性,如表1-1所示。
表1-1 相对布局中只取true 或false 的属性及说明
| 属性名称 |
属性说明 |
| android:layout_centerHorizontal |
当前控件位于父控件的横向中间位置 |
| android:layout_centerVertical |
当前控件位于父控件的纵向中间位置 |
| android:layout_centerInParent |
当前控件位于父控件的中央位置 |
| android:layout_alignParentBottom |
当前控件底端与父控件底端对齐 |
接下来看属性值为其他控件ID的属性,如表1-2所示。
表1-2 相对布局中取值为其他控件ID 的属性及
| 属性名称 |
属性说明 |
| android:layout_toRightOf |
使当前控件位于给出ID |
| android:layout_toLeftOf |
使当前控件位于给出ID |
| android:layout_above |
使当前控件位于给出ID |
| android:layout_below |
使当前控件位于给出ID |
| android:layout_alignTop |
使当前控件的上边界位于给出ID |
android:layout_alignBottom |
使当前控件的下边界位于给出ID |
android:layout_alignLeft |
使当前控件的左边界位于给出ID |
android:layout_alignRight |
使当前控件的右边界位于给出ID |
后要介绍的是属性值以像素为单位的属性及说明,如表1-3所示。
表1-3 相对布局中取值为像素的属性及说明
| 属性名称 |
属性说明 |
| android:layout_marginLeft |
当前控件左侧的留白 |
| android:layout_marginRight |
当前控件右侧的留白 |
| android:layout_marginTop |
当前控件上方的留白 |
| android:layout_marginBottom |
当前控件下方的留白 |
需要注意的是在进行相对布局时要避免出现循环依赖,例如,设置相对布局在父容器中的排列方式为WRAP_CONTENT,就不能再将相对布局的子控件设置为ALIGN_PARENT_BOTTOM。因为这样会造成子控件和父控件相互依赖和参照的错误。
以下用一个相对布局的例子来加深对线性布局的理解。首先来看一下相对布局的效果图,如图-1所示。
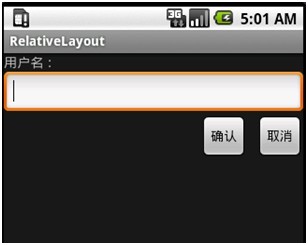
图-1 相对布局效果图
为达到以上效果,按以下步骤进行操作。
(1)添加TextView控件(用户名),相对布局会将TextView控件放置在屏幕的上方。
(2)添加EditText控件(输入框),并声明该控件的位置在TextView控件的下方,相对布局会根据TextView的位置确定EditText控件的位置。
(3)添加第一个Button控件(“取消”按钮),声明在EditText控件的下方,且在父控件的右边。
(4)添加第二个Button控件(“确认”按钮),声明该控件在第一个Button控件的左方,且与第一个Button控件处于相同的水平位置。
相对布局在main.xml文件的完整代码如代码清单1所示。
代码清单1 main.xml
<?xml version="1.0" encoding="utf-8"?>
<RelativeLayout android:id="@+id/RelativeLayout01"
android:layout_width="match_parent"
android:layout_height="match_parent"
xmlns:android="//schemas.android.com/apk/res/android">
<TextView android:id="@+id/label"
android:layout_height="wrap_content"
android:layout_width="match_parent"
android:text="用户名:">
</TextView>
<EditText android:id="@+id/entry"
android:layout_height="wrap_content"
android:layout_width="match_parent"
android:layout_below="@id/label">
</EditText>
<Button android:id="@+id/cancel"
android:layout_height="wrap_content"
android:layout_width="wrap_content"
android:layout_alignParentRight="true"
android:layout_marginLeft="10dip"
android:layout_below="@id/entry"
android:text="取消" >
</Button>
<Button android:id="@+id/ok"
android:layout_height="wrap_content"
android:layout_width="wrap_content"
android:layout_toLeftOf="@id/cancel"
android:layout_alignTop="@id/cancel"
android:text="确认">、
</Button>
</RelativeLayout>
在代码中,第3行使用了标签声明一个相对布局;第15行使用位置属性android:layout_below,确定EditText控件在ID为label的元素下方;第20行使用属性android:layout_alignParentRight,声明该元素在其父元素的右边边界对齐;第21行设定属性android:layout_marginLeft,左移10dip;第22行声明该元素在ID为entry的元素下方;第28行声明使用属性android:layout_toLeftOf,声明该元素在ID为cancel元素的左边;第29行使用属性android:layout_alignTop,声明该元素与ID为cancel的元素在相同的水平位置。