表格布局TableLayout 类以行和列的形式管理控件,每行为一个TableRow 对象,也可以为一个View对象,当为View 对象时,该View 对象将跨越该行的所有列。在TableRow 中可以添加子控件,每添加一个子控件为一列。
TableLayout 布局中并不会为每一行、每一列或每个单元格绘制边框,每一行可以有0 或多个单元格,每个单元格为一个View 对象。TableLayout 中可以有空的单元格,单元格也可以像HTML 中那样跨越多个列。图-1是表格布局的示意图。
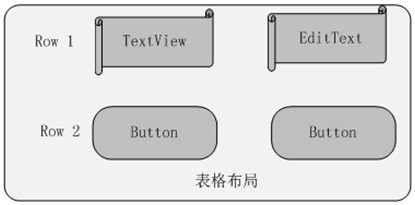
图-1 表格布局示意图
在表格布局中,一个列的宽度由该列中宽的那个单元格指定,而表格的宽度是由父容器指定的。在TableLayout 中,可以为列设置3种属性。
`Shrinkable,如果一个列被标识为shrinkable,则该列的宽度可以进行收缩,以使表格能够适应其父容器的大小。
`Stretchable,如果一个列被标识为stretchable,则该列的宽度可以进行拉伸,以填满表格中空闲的空间。
`Collapsed,如果一个列被标识为collapsed,则该列将会被隐藏。
注意:一个列可以同时具有Shrinkable 和Stretchable 属性,在这种情况下,该列的宽度将任意拉伸或收缩以适应父容器。
TableLayout 继承自LinearLayout 类,除了继承来自父类的属性和方法,TableLayout 类中还包含表格布局所特有的属性和方法。这些属性和方法说明如表1-1所示。
表1-1 TableLayout 类常用属性及对应方法说明
| 属性名称 |
对应方法 |
描述 |
| android:collapseColumns |
setColumnCollapsed(int,boolean) |
设置指定列号的列为Collapsed,列号从0 |
| android:shrinkColumns |
setShrinkAllColumns(boolean) |
设置指定列号的列为Shrinkable,列号从0 |
| android:stretchColumns |
setStretchAllColumns(boolean) |
设置指定列号的列为Stretchable,列号从0 |
以下我们用一个表格布局的例子来加深对表格布局的理解,首先,建立表格布局要注意以下几点:
(1)向界面中添加一个表格布局,无须修改布局的属性值。其中,ID属性为TableLayout01,Layout width和Layout height属性都为wrap_content。
(2)向TableLayout01中添加两个TableRow。TableRow代表一个单独的行,每行被划分为几个小的单元,单元中可以添加一个界面控件。其中,ID属性分别为TableRow01和TableRow02,Layout width和Layout height属性都为wrap_content。
(3)通过Outline,向TableRow01中添加TextView和EditText;向TableRow02中添加两个Button。
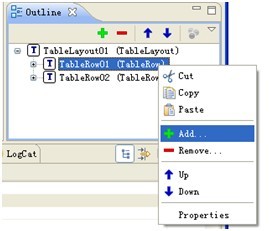
图-2 向TableRow01中添加TextView和EditText
参考表1-2设置TableRow中4个界面控件的属性值。
表1-2 表格布局控件属性
| 编号 |
类型 |
属性 |
值 |
| 1 |
TextView |
| id |
| text |
| gravity |
| padding |
| Layout_width |
|
| @+id/label |
| 用户名: |
| right |
| 3dip |
| 160dip |
|
| 2 |
EditText |
| id |
| text |
| padding |
| Layout_width |
|
| @+id/entry |
| [null] |
| 3dip |
| 160dip |
|
| 3 |
Button |
|
|
| 3 |
Button |
|
|
(4)main.xml完整代码如代码清单1所示。
代码清单1 main.xml
<?xml version="1.0" encoding="utf-8"?>
<TableLayout android:id="@+id/TableLayout01"
android:layout_width="match_parent"
android:layout_height="match_parent"
xmlns:android="//schemas.android.com/apk/res/android">
<TableRow android:id="@+id/TableRow01"
android:layout_width="wrap_content"
android:layout_height="wrap_content">
<TextView android:id="@+id/label"
android:layout_height="wrap_content"
android:layout_width="160dip"
android:gravity="right"
android:text="用户名:"
android:padding="3dip" >
</TextView>
<EditText android:id="@+id/entry"
android:layout_height="wrap_content"
android:layout_width="160dip"
android:padding="3dip" >
</EditText>
</TableRow>
<TableRow android:id="@+id/TableRow02"
android:layout_width="wrap_content"
android:layout_height="wrap_content">
<Button android:id="@+id/ok"
android:layout_height="wrap_content"
android:padding="3dip"
android:text="确认">
</Button>
<Button android:id="@+id/Button02"
android:layout_width="wrap_content"
android:layout_height="wrap_content"
android:padding="3dip"
android:text="取消">
</Button>
</TableRow>
</TableLayout>
代码中,第3行代码使用了<TableLayout>标签声明表格布局;第7行和第23行代码声明了两个TableRow元素;第12行设定宽度属性android:layout_width:160dip;第13行设定属性android:gravity,指定文字为右对齐;第15行使用属性android:padding,声明TextView元素与其他元素的间隔距离为3dip。
(5)表格布局运行效果如图-3所示。
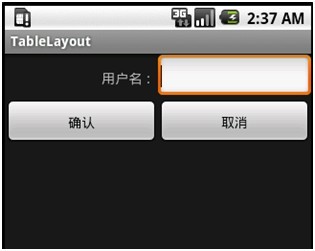
图-3 表格布局运行图