线性布局是Android界面布局中简单的布局之一,它提供了控件水平或者垂直排列的模型。如图-1所示,线性布局中,所有的子元素如果垂直排列,则每行仅包含一个界面元素;如果水平排列,则每列仅包含一个界面元素。
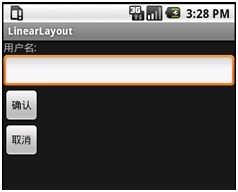
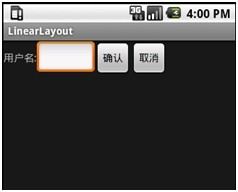
图-1 线性布局(LinearLayout)效果图
同时,使用此布局时可以通过设置控件的Weight 参数控制各个控件在容器中的相对大小。LinearLayout 布局的属性既可以在布局文件(XML)中设置,也可以通过成员方法进行设置。表1-1给出了LinearLayout 常用的属性及这些属性的对应设置方法。
表1-1 LinearLayout 常用属性及对应方法
| 属性名称 |
对应方法 |
描述 |
| android:orientation |
setOrientation(int) |
设置线性布局的朝向,可取horizontal |
| android:gravity |
setGravity(int) |
设置线性布局的内部元素的布局方式 |
在线性布局中可使用gravity 属性来设置控件的对齐方式,gravity 可取的值及说明如表1-2所示。
提示:当需要为gravity 设置多个值时,用“|”分隔即可。
表1-2 gravity 可取的属性及说明
| 属性 |
说明 |
| top |
不改变控件大小,对齐到容器顶部 |
| bottom |
不改变控件大小,对齐到容器底部 |
| left |
不改变控件大小,对齐到容器左侧 |
| right |
不改变控件大小,对齐到容器右侧 |
| center_vertical |
不改变控件大小,对齐到容器纵向中央位置 |
| center-horizontal |
不改变控件大小,对齐到容器横向中央位置 |
| center |
不改变控件大小,对齐到容器中央位置 |
| fill_vertical |
若有可能,纵向拉伸以填满容器 |
| fill_horizontal |
若有可能,横向拉伸以填满容器 |
| fill |
若有可能,纵向横向同时拉伸以填满容器 |
以下用一个线性布局的例子来加深对线性布局的理解。
1.创建一个名为LinearLayout的Android工程
包名称是edu.hrbeu.LinearLayout,Activity名称为LinearLayout。为了能够完整体验创建线性布局的过程,我们需要删除Eclipse自动建立的/res/layout/main.xml文件,之后我们将手动创建一个XML布局文件。
2.建立XML线性布局文件
首先,删除Eclipse自动建立的/res/layout/main.xml文件;其次,建立用于显示垂直排列线性布局的XML文件:右击/res/layout文件夹,选择“New”→“File”命令打开新文件建立向导,文件名为main_vertical.xml,保存位置为LinearLayout/res/layout,如图-2所示。
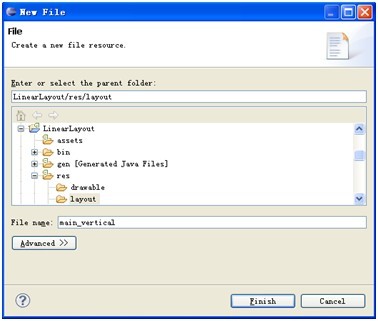
图-2 新建线性布局XML文件
3.编辑XML线性布局文件
打开XML文件编辑器,对main_vertical.xml文件的代码做如代码清单5-1所示的修改。
代码清单1-1 main_vertical.xml
<?xml version="1.0" encoding="utf-8"?>
<LinearLayout
xmlns:android="//schemas.android.com/apk/res/android"
android:layout_width="match_parent"
android:layout_height="wrap_content"
android:orientation="vertical">
</LinearLayout>
第2行代码是声明XML文件的根元素为线性布局;第4、5、6行代码是在属性编辑器中修改过的宽度、高度和排列方式的属性。同样地,用户可以在可视化编辑器和属性编辑器中对页面布局进行修改,这些修改会同步地反映在XML文件中。
4.添加控件
将四个界面控件TextView、EditText、Button、Button先后拖曳到可视化编辑器中,所有控件都自动获取控件名称,并把该名称显示在控件上,如TextView01、EditText01、Button01和Button02。
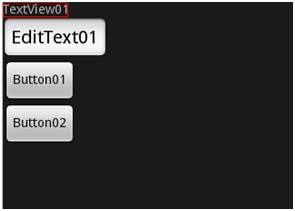
图-3 线性布局添加控件
修改界面控件的属性如表1-3所示。
表1-3 线性布局控件属性
| 编号 |
类型 |
属性 |
值 |
| 1 |
TextView |
|
|
| 2 |
EditText |
|
|
| 3 |
Button |
|
|
| 4 |
Button |
|
|
打开XML文件编辑器查看main_vertical.xml文件代码,发现在属性编辑器内填入的文字已经正常写入XML文件中,如代码清单5-2中第11、20、25行代码。
代码清单1-2 main_vertical.xml
<?xml version="1.0" encoding="utf-8"?>
<LinearLayout
xmlns:android="//schemas.android.com/apk/res/android"
android:layout_width="match_parent"
android:layout_height="wrap_content"
android:orientation="vertical">
<TextView android:id="@+id/label"
android:layout_width="wrap_content"
android:android:layout_height="wrap_content"
android:android:text="用户名: " >
</TextView>
<EditText android:id="@+id/entry"
android:layout_height="wrap_content"
android:layout_width="match_parent">
</EditText>
<Button android:id="@+id/ok"
android:layout_width="wrap_content"
android:layout_height="wrap_content"
android:text="确认">
</Button>
<Button android:id="@+id/cancel"
android:layout_width="wrap_content"
android:layout_height="wrap_content"
android:text="取消" >
</Button>
</LinearLayout>
5.修改LinearLayout.java文件
将LinearLayout.java文件中的setContentView(R.layout.main),更改为setContentView
(R.layout.main_vertical)。
同理,按照以上步骤,可以得到横向线性布局。
·建立main_ horizontal.xml文件。
·线性布局的Orientation属性的值设置为horizontal。
·将EditText的Layout width 属性的值设置为wrap_content。
·将LinearLayout.java文件中的setContentView(R.layout.main_vertical)修改为setContentView(R.layout.main_ horizontal)。