框架布局(FrameLayout)是简单的Android界面布局,它在屏幕上开辟出了一块区域,在这块区域中可以添加多个子控件,但是所有的子控件都被对齐到屏幕的左上角。框架布局的大小由子控件中尺寸大的那个子控件来决定。如果子控件一样大,同一时刻只能看到上面的子控件。
FrameLayout 继承自ViewGroup,除了继承自父类的属性和方法,FrameLayout 类中包含了自己特有的属性和方法,如表1-1所示。
表1-2 FrameLayout常用属性及对应方法
| 属性名称 |
对应方法 |
描述 |
| android:foreground |
setForeground(Drawable) |
设置绘制在所有子控件之上的内容 |
| android:foregroundGravity |
setForegroundGravity(int) |
设置绘制在所有子控件之上内容的gravity |
提示:在FrameLayout 中,子控件是通过栈来绘制的,所以后添加的子控件会被绘制在上层。
以下用一个FrameLayout的例子来加深对FrameLayout的理解。
(1)在Eclipse 中新建一个项目FrameLayout。打开其res/values 目录下的strings.xml,在其中输入如代码清单1所示代码。在该段代码中声明了应用程序总会用到的字符串资源。
代码清单1 strings.xml
<?xml version="1.0" encoding="utf-8"?>
<resources>
<string name="app_name">FrameExample</string>
<string name="big">大的</string>
<string name="middle">中的</string>
<string name="small">小的</string>
</resources>
(2)在项目rers/values 目录下新建一个colors.xml,在其中输入如代码清单2所示代码。该段代码声明了应用程序中将会用到的颜色资源。这样将所有颜色资源统一管理有助于提高程序的可读性及可维护性。
代码清单2 colors.xml
<?xml version="1.0" encoding="utf-8"?>
<resources>
<color name="red">#FF0000</color>
<color name="green">#00FF00</color>
<color name="blue">#0000FF</color>
<color name="white">#FFFFFF</color>
</resources>
(3)打开项目res/layout 目录下的main.xml 文件,将其中已有的代码替换为如代码清单3所示代码。
代码清单3 main.xml
<?xml version="1.0" encoding="utf-8"?>
<FrameLayout
android:id="@+id/FrameLayout01"
android:layout_width="match_parent"
android:layout_height="match_parent"
android:background="@color/white"
xmlns:android="//schemas.android.com/apk/res/android">
<TextView
android:text="@string/big"
android:id="@+id/TextView01"
android:layout_width="wrap_content"
android:layout_height="wrap_content"
android:textSize="60px"
android:textColor="@color/green"
> <!-- 声明一个TextView 控件 -->
</TextView>
<TextView
android:text="@string/middle"
android:id="@+id/TextView02"
android:layout_width="wrap_content"
android:layout_height="wrap_content"
android:textSize="40px"
android:textColor="@color/red"
> <!-- 声明一个TextView 控件 -->
</TextView>
<TextView
android:text="@string/small"
android:id="@+id/TextView03"
android:layout_width="wrap_content"
android:layout_height="wrap_content"
android:textSize="20px"
android:textColor="@color/blue"
> <!-- 声明一个TextView 控件 -->
</TextView>
</FrameLayout>
代码第2~7行声明了一个框架布局,并设置其在父控件中的显示方式及自身的背景颜色;代码第8~16行声明了一个TextView控件,该控件ID为TextView01,第13 行定义了其显示内容的字号为60px,第14 行定义了所显示内容的字体颜色为绿色;代码第17~25 行声明了一个TextView 控件,该控件ID为TextView02,第22行定义了其显示内容的字号为40px,第23 行定义了所显示内容的字体颜色为红色;代码第26~34行声明了一个TextView控件,该控件id为TextView03,第22行定义了其显示内容的字号为20px,第23 行定义了所显示内容的字体颜色为蓝色。
运行程序,在图-1所示的运行效果图中可以看到,程序运行时所有的子控件都自动地对齐到容器的左上角,由于子控件的TextView 是按照字号从大到小排列的,所以字号小的在上层。
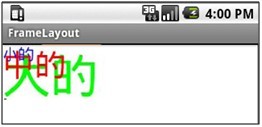
图-1 框架布局运行效果图