
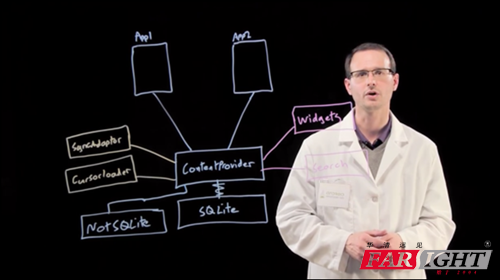
现在 ORM 满天飞,但是 Content Provider 毕竟是 Google 的亲儿子,和 CursorLoader,SyncAdapter 配合起来更加是天衣无缝。为其他应用提供数据你需要content provider,为系统中的 widget 提供数据,也需要 content provider 接口。
<img src="https://pic3.zhimg.com/v2-b661a358a2572e497448002aa3519946_b.png" data-rawwidth="1710" data-rawheight="958" class="origin_image zh-lightbox-thumb" width="1710" data-original="https://pic3.zhimg.com/v2-b661a358a2572e497448002aa3519946_r.png">
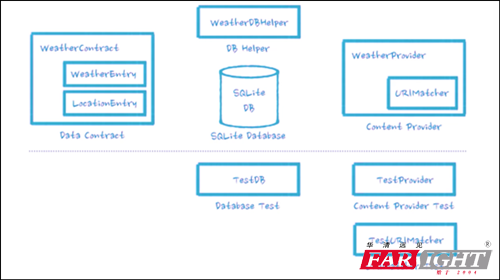
很多人可能没有从来没有写过Content Provider,更加视 SQLite 语句如洪水猛兽。 其实也没什么难的,只要10分钟阅读这篇文章,加上一个周末时间自己手动实践,你就能打开了一个新的大门! 直接上例子,例如我们要做一个天气应用。先来个俯瞰图,我们会完成三个大部分,WeatherContract,WeatherDBHelper,WeatherProvider 和他们对应的测试类,测试类很重要!
<img src="https://pic4.zhimg.com/v2-244436355700abd2c5b5c0b2190dc4d7_b.png" data-rawwidth="1736" data-rawheight="970" class="origin_image zh-lightbox-thumb" width="1736" data-original="https://pic4.zhimg.com/v2-244436355700abd2c5b5c0b2190dc4d7_r.png">
Contract 设计表
Contract 字面上是合同的意思。在这里就是指制定规则,数据库有哪些表,每个表有哪些列,如何访问数据。
因为我们要现实多个地方的天气,每个地方又有多日的天气,因此我们需要两个表Weather 和 Location,并且在Weather表中有一个Location_id作为外键指向Location表的主键
<img src="https://pic4.zhimg.com/v2-7a3abfb6bd2f68f97d816d6c7c50bf4f_b.png" data-rawwidth="1752" data-rawheight="970" class="origin_image zh-lightbox-thumb" width="1752" data-original="https://pic4.zhimg.com/v2-7a3abfb6bd2f68f97d816d6c7c50bf4f_r.png">

然后天气表当然还要包含很多我们需要显示的信息,例如日期,高温度,低温度,天气状况等等。具体代码可以定义如下:
/* Inner class that defines the contents of the weather table */
public static final class WeatherEntry implements BaseColumns {
public static final String TABLE_NAME = "weather";
// Column with the foreign key into the location table.
public static final String COLUMN_LOC_KEY = "location_id";
// Date, stored as long in milliseconds since the epoch
public static final String COLUMN_DATE = "date";
// Weather id as returned by API, to identify the icon to be used
public static final String COLUMN_WEATHER_ID = "weather_id";
// Short description and long description of the weather, as provided by API.
// e.g "clear" vs "sky is clear".
public static final String COLUMN_SHORT_DESC = "short_desc";
// Min and max temperatures for the day (stored as floats)
public static final String COLUMN_MIN_TEMP = "min";
public static final String COLUMN_MAX_TEMP = "max";
// Humidity is stored as a float representing percentage
public static final String COLUMN_HUMIDITY = "humidity";
// Humidity is stored as a float representing percentage
public static final String COLUMN_PRESSURE = "pressure";
// Windspeed is stored as a float representing windspeed mph
public static final String COLUMN_WIND_SPEED = "wind";
// Degrees are meteorological degrees (e.g, 0 is north, 180 is south). Stored as floats.
public static final String COLUMN_DEGREES = "degrees";
}
/*
Inner class that defines the contents of the location table
*/
public static final class LocationEntry implements BaseColumns {
public static final String TABLE_NAME = "location";
// The location setting string is what will be sent to openweathermap
// as the location query.
public static final String COLUMN_LOCATION_SETTING = "location_setting";
// Human readable location string, provided by the API. Because for styling,
// "Mountain View" is more recognizable than 94043.
public static final String COLUMN_CITY_NAME = "city_name";
// In order to uniquely pinpoint the location on the map when we launch the
// map intent, we store the latitude and longitude as returned by openweathermap.
public static final String COLUMN_COORD_LAT = "coord_lat";
public static final String COLUMN_COORD_LONG = "coord_long";
}
}
WeatherDBHelper 实现
完成了表的设计以后,我们要用SQLiteDbHelper来真正创建数据库。其实就是写两个创建表的SQL语句,然后执行SQL语句。
@Override
public void onCreate(SQLiteDatabase sqLiteDatabase) {
final String SQL_CREATE_LOCATION_TABLE = "CREATE TABLE " + LocationEntry.TABLE_NAME + " (" +
LocationEntry._ID + " INTEGER PRIMARY KEY," +
LocationEntry.COLUMN_LOCATION_SETTING + " TEXT UNIQUE NOT NULL, " +
LocationEntry.COLUMN_CITY_NAME + " TEXT NOT NULL, " +
LocationEntry.COLUMN_COORD_LAT + " REAL NOT NULL, " +
LocationEntry.COLUMN_COORD_LONG + " REAL NOT NULL " +
" );";
final String SQL_CREATE_WEATHER_TABLE = "CREATE TABLE " + WeatherEntry.TABLE_NAME + " (" +
WeatherEntry._ID + " INTEGER PRIMARY KEY AUTOINCREMENT," +
// the ID of the location entry associated with this weather data
WeatherEntry.COLUMN_LOC_KEY + " INTEGER NOT NULL, " +
WeatherEntry.COLUMN_DATE + " INTEGER NOT NULL, " +
WeatherEntry.COLUMN_SHORT_DESC + " TEXT NOT NULL, " +
WeatherEntry.COLUMN_WEATHER_ID + " INTEGER NOT NULL," +
WeatherEntry.COLUMN_MIN_TEMP + " REAL NOT NULL, " +
WeatherEntry.COLUMN_MAX_TEMP + " REAL NOT NULL, " +
WeatherEntry.COLUMN_HUMIDITY + " REAL NOT NULL, " +
WeatherEntry.COLUMN_PRESSURE + " REAL NOT NULL, " +
WeatherEntry.COLUMN_WIND_SPEED + " REAL NOT NULL, " +
WeatherEntry.COLUMN_DEGREES + " REAL NOT NULL, " +
// Set up the location column as a foreign key to location table.
" FOREIGN KEY (" + WeatherEntry.COLUMN_LOC_KEY + ") REFERENCES " +
LocationEntry.TABLE_NAME + " (" + LocationEntry._ID + "), " +
// To assure the application have just one weather entry per day
// per location, it's created a UNIQUE constraint with REPLACE strategy
" UNIQUE (" + WeatherEntry.COLUMN_DATE + ", " +
WeatherEntry.COLUMN_LOC_KEY + ") ON CONFLICT REPLACE);";
sqLiteDatabase.execSQL(SQL_CREATE_LOCATION_TABLE);
sqLiteDatabase.execSQL(SQL_CREATE_WEATHER_TABLE);
}
TestDb实现
到这里我们已经可以设计一些测试样例来测试两个表是否都成功建立,编写 ContentValues,测试插入成功,读取成功,主键,副键和约束条件是否生效等等。
这里代码就省略了。可以在文章后找到课程地址,查看一步步建立content provider的课程视频。
Contract 设计URI
设计URI就是设计如何和表中的信息交互,包括读和写。作为一个天气应用,当然我们要获取
• 所有天气,
• 某个位置的所有天气,
• 以及某个位置某个日期的天气
• 所有位置,
四种访问数据的方式。其中第三种返回一个,其他都返回多个。根据这些需求,我们可以定义以下四个 URI 和他们对应的类型。
<img src="https://pic2.zhimg.com/v2-4c5fa62cd792c3d17c9a12f95e9fe425_b.png" data-rawwidth="1263" data-rawheight="854" class="origin_image zh-lightbox-thumb" width="1263" data-original="https://pic2.zhimg.com/v2-4c5fa62cd792c3d17c9a12f95e9fe425_r.png">

这里写出contract里面所有代码太长了,就用Weather Path 下面的三个URI作为例子, 省略了Location Path下面的 URI,和一些辅助函数。
public static final String CONTENT_AUTHORITY = "com.example.android.sunshine.app";
public static final Uri BASE_CONTENT_URI = Uri.parse("content://" + CONTENT_AUTHORITY);
public static final String PATH_WEATHER = "weather";
public static final Uri CONTENT_URI =
BASE_CONTENT_URI.buildUpon().appendPath(PATH_WEATHER).build();
public static final String CONTENT_TYPE =
ContentResolver.CURSOR_DIR_BASE_TYPE + "/" + CONTENT_AUTHORITY + "/" + PATH_WEATHER;
public static final String CONTENT_ITEM_TYPE =
ContentResolver.CURSOR_ITEM_BASE_TYPE + "/" + CONTENT_AUTHORITY + "/" + PATH_WEATHER;
public static Uri buildWeatherUri(long id) {
return ContentUris.withAppendedId(CONTENT_URI, id);
}
public static Uri buildWeatherLocation(String locationSetting) {
return CONTENT_URI.buildUpon()
.appendPath(locationSetting)
.build();
}
public static Uri buildWeatherLocationWithDate(String locationSetting, long date) {
return CONTENT_URI.buildUpon()
.appendPath(locationSetting)
.appendPath(Long.toString(normalizeDate(date)))
.build();
}
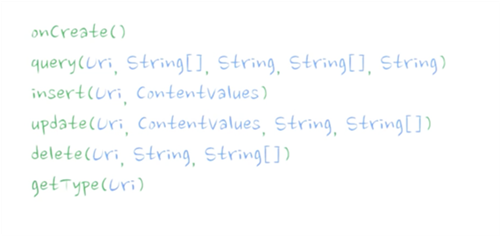
Content Provider 重载
万事俱备,下面开始开始真正重载 ContentProvider,完成我们自己的WeatherProvider了. 我们需要重载下面几个核心函数。onCreate比较简单,只需要在里面创建并获取数据库就可以了。但是在开始完成其他五个函数之前,我们先要实现UriMatcher, 因为这五个函数都依赖于UriMatcher 来为每个URI匹配正确的行为。
<img src="https://pic2.zhimg.com/v2-a6b68f31335a0d6c834550faf02a0f2d_b.png" data-rawwidth="1264" data-rawheight="594" class="origin_image zh-lightbox-thumb" width="1264" data-original="https://pic2.zhimg.com/v2-a6b68f31335a0d6c834550faf02a0f2d_r.png">
Content Provider UriMatcher
我们需要用 UriMatcher 来确认进入provider的 URI是哪里个,从而完成相对应的工作。上面的设计有四个URI,因此我们需要匹配所有四种 URI
static final int WEATHER = 100;
static final int WEATHER_WITH_LOCATION = 101;
static final int WEATHER_WITH_LOCATION_AND_DATE = 102;
static final int LOCATION = 300;
static UriMatcher buildUriMatcher() {
final UriMatcher matcher = new UriMatcher(UriMatcher.NO_MATCH);
final String authority = WeatherContract.CONTENT_AUTHORITY;
// For each type of URI you want to add, create a corresponding code.
matcher.addURI(authority, WeatherContract.PATH_WEATHER, WEATHER);
matcher.addURI(authority, WeatherContract.PATH_WEATHER + "/*", WEATHER_WITH_LOCATION);
matcher.addURI(authority, WeatherContract.PATH_WEATHER + "/*/#", WEATHER_WITH_LOCATION_AND_DATE);
matcher.addURI(authority, WeatherContract.PATH_LOCATION, LOCATION);
return matcher;
}
这里也是个绝佳的时间添加一些 URIMatcher 的测试代码来确认是否每个uri 都已经被正确得匹配。 这会节省你很多很多的调试的时间。
Content Provider getType()
getType是剩余五个函数里面简单的,匹配uri以后,只要返回对应的type就可以了。对于其他的query,insert,update,delete 我们也采取同样的 switch case语句,只不过每个情况都稍微复杂一点罢了。
@Override
public String getType(Uri uri) {
// Use the Uri Matcher to determine what kind of URI this is.
final int match = sUriMatcher.match(uri);
switch (match) {
// Student: Uncomment and fill out these two cases
case WEATHER_WITH_LOCATION_AND_DATE:
return WeatherContract.WeatherEntry.CONTENT_ITEM_TYPE;
case WEATHER_WITH_LOCATION:
return WeatherContract.WeatherEntry.CONTENT_TYPE;
case WEATHER:
return WeatherContract.WeatherEntry.CONTENT_TYPE;
case LOCATION:
return WeatherContract.LocationEntry.CONTENT_TYPE;
default:
throw new UnsupportedOperationException("Unknown uri: " + uri);
}
}
Content Provider query()
query 是复杂的,基本结构当然和 getType一样,但是就像之前说的,每个情况都略微复杂。如果要获得某个日期,某个地点的天气,我们就需要把两个表join起来才可以。因此我们定义一个比较复杂的from语句,和一个比较复杂的where语句。我们就以复杂的 WEATHER_WITH_LOCATION_AND_DATE 为例
case WEATHER_WITH_LOCATION_AND_DATE:
{
sWeatherByLocationSettingQueryBuilder = new SQLiteQueryBuilder();
//FROM clause
//This is an inner join which looks like
//weather INNER JOIN location ON weather.location_id = location._id
sWeatherByLocationSettingQueryBuilder.setTables(
WeatherContract.WeatherEntry.TABLE_NAME + " INNER JOIN " +
WeatherContract.LocationEntry.TABLE_NAME +
" ON " + WeatherContract.WeatherEntry.TABLE_NAME +
"." + WeatherContract.WeatherEntry.COLUMN_LOC_KEY +
" = " + WeatherContract.LocationEntry.TABLE_NAME +
"." + WeatherContract.LocationEntry._ID);
//WHERE clause
String sLocationSettingAndDaySelection =
WeatherContract.LocationEntry.COLUMN_LOCATION_SETTING + " = ?"
+ " AND " + WeatherContract.WeatherEntry.COLUMN_DATE + " = ?";
//WHER clause argument
String locationSetting = WeatherContract.WeatherEntry.getLocationSettingFromUri(uri);
long date = WeatherContract.WeatherEntry.getDateFromUri(uri);
//actual SQL query statement
retCursor = sWeatherByLocationSettingQueryBuilder.query(mOpenHelper.getReadableDatabase(),
projection,
sLocationSettingAndDaySelection,
new String[]{locationSetting, Long.toString(date)},
null,
null,
sortOrder
);
break;
}
retCursor.setNotificationUri(getContext().getContentResolver(), uri);
return retCursor
Content Provider update(), insert(), delete()
update insert delete 相对比较简单,因为我们只需要针对 WEATHER 和 LOCATION 两种URI进行操作就可以了。需要注意的是,在对数据库进行修改了以后,应该调用
getContext().getContentResolver().notifyChange(uri, null);
来通知所有的observer这个URI内容变化了,loader的功效在这里也就体现出来了。这里就只给出insert的代码,其他两个的类似
@Override
public Uri insert(Uri uri, ContentValues values) {
final SQLiteDatabase db = mOpenHelper.getWritableDatabase();
final int match = sUriMatcher.match(uri);
Uri returnUri;
switch (match) {
case WEATHER: {
normalizeDate(values);
long _id = db.insert(WeatherContract.WeatherEntry.TABLE_NAME, null, values);
if ( _id > 0 )
returnUri = WeatherContract.WeatherEntry.buildWeatherUri(_id);
else
throw new android.database.SQLException("Failed to insert row into " + uri);
break;
}
case LOCATION: {
long _id = db.insert(WeatherContract.LocationEntry.TABLE_NAME, null, values);
if ( _id > 0 )
returnUri = WeatherContract.LocationEntry.buildLocationUri(_id);
else
throw new android.database.SQLException("Failed to insert row into " + uri);
break;
}
default:
throw new UnsupportedOperationException("Unknown uri: " + uri);
}
getContext().getContentResolver().notifyChange(uri, null);
return returnUri;
}
以上过程为自己动手写的ContentProvider。造轮子还是对理解很有帮助的。

热点新闻


